
Why Is My AC Not Blowing Cold Air?
Few things are worse than an AC that’s running but not cooling, especially during a hot summer. If your air conditioner is blowing warm air or struggling to cool, here are the most common reasons why this happens and what you can do:
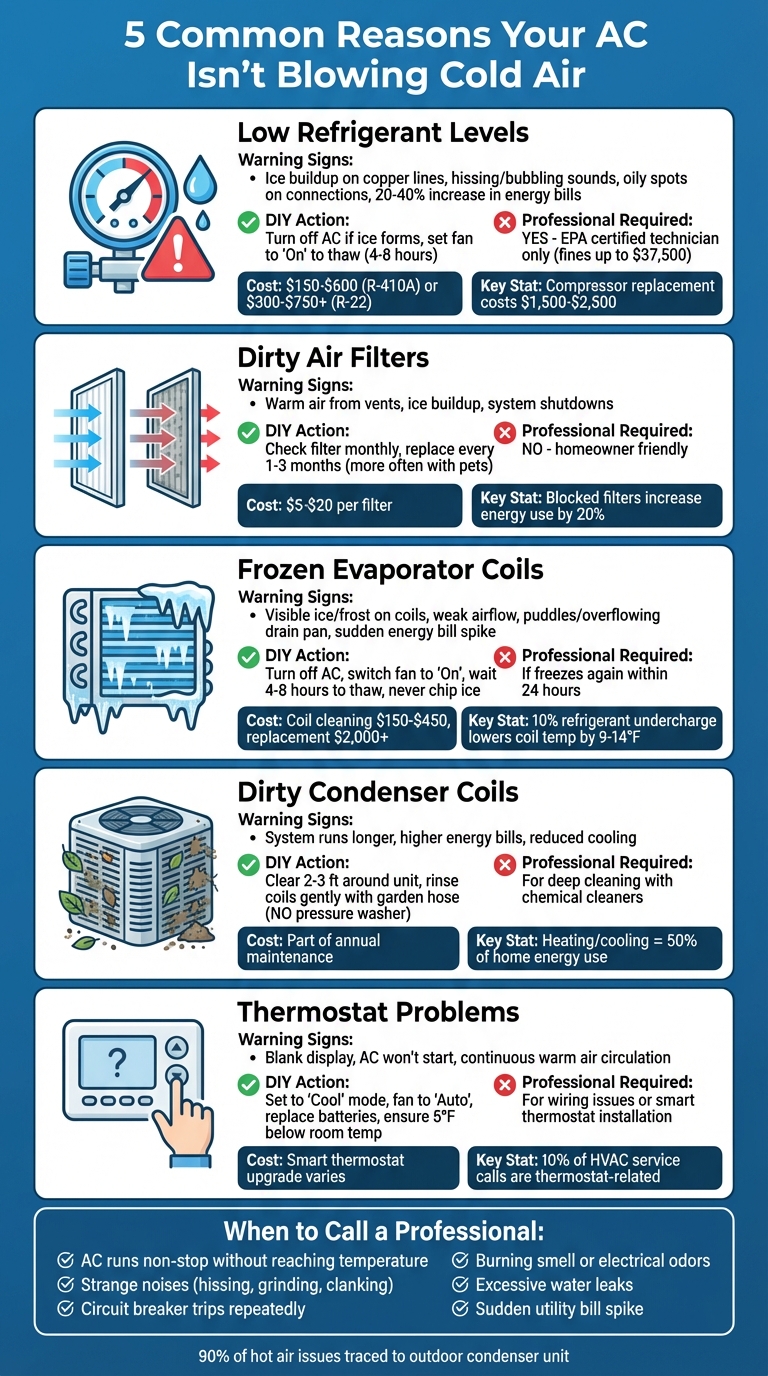
- Low Refrigerant Levels: Leaks can reduce cooling efficiency and damage the compressor. Look for ice buildup or hissing sounds near the unit.
- Dirty Air Filters: Clogged filters restrict airflow, causing warm air or even system shutdowns. Replace them every 1–3 months.
- Frozen Evaporator Coils: Poor airflow or low refrigerant can cause ice buildup on the coils, blocking cooling.
- Dirty Condenser Coils: Dust and debris on outdoor coils can overheat the system and reduce efficiency.
- Thermostat Issues: Incorrect settings, dead batteries, or poor placement can disrupt cooling.
Start with simple fixes like checking filters, cleaning the outdoor unit, or adjusting thermostat settings. If problems persist, call a professional HVAC technician to avoid costly repairs or system damage.
5 Common Reasons Your AC Isn't Blowing Cold Air and How to Fix Them
10 Reasons Why Your AC Is NOT Blowing Cold Air In Your Home! DIY How To FIX!
sbb-itb-ab7d5a1
1. Low Refrigerant Levels
Air conditioners work by removing heat from your home, not by creating cold air. This process relies on refrigerant (commonly referred to as Freon) circulating through the system. As HVAC Laboratory explains:
Air conditioners don't create cold - they remove heat from indoor air and transfer it outdoors through a refrigeration cycle that depends entirely on refrigerant's unique properties. [HVAC Laboratory]
If your system is low on refrigerant, it’s a clear sign of a leak, as the system is sealed and shouldn't lose refrigerant under normal conditions. Simply adding more refrigerant to a leaking system isn’t a solution - it’s not only ineffective but also against EPA regulations.
Low refrigerant levels can lead to more than just poor cooling performance; they can also damage the compressor. Compressor replacements are costly, often ranging from $1,500 to $2,500. Peter, Owner of PRO Electric Plus HVAC, explains:
The compressor is the heart of your air conditioner or heat pump... running the AC with inadequate refrigerant can damage the compressor (it relies on refrigerant for cooling and lubrication). [Peter, PRO Electric Plus HVAC]
Low refrigerant is just one potential issue affecting your AC’s performance. Other common problems include dirty filters and thermostat malfunctions. However, recognizing the signs of low refrigerant early can help you avoid costly repairs.
How to Spot Low Refrigerant
One of the most noticeable signs of low refrigerant is ice buildup. Check for frost or ice on the copper refrigerant lines leading to the outdoor unit or on the indoor evaporator coil. When refrigerant pressure drops, the coil's temperature can fall below 32°F, causing ice to form.
Unusual sounds can also signal a problem. A hissing noise near your AC unit may point to high-pressure gas escaping from a leak, while bubbling sounds often indicate a leak in the liquid line. You might also notice oily or greasy spots on refrigerant lines or connections, as refrigerant oil can escape along with the gas.
Additional warning signs include vents blowing lukewarm air, the system running continuously without reaching the set temperature, and a noticeable 20–40% increase in your energy bill. Your home may also feel more humid or clammy since the system struggles to dehumidify effectively.
If you see ice forming, turn off your AC immediately and set the thermostat fan to "On." This helps the ice melt without overloading the compressor. Keep in mind that thawing frozen coils can take several hours.
Why You Shouldn't Handle Refrigerant Yourself
According to EPA Section 608, only certified technicians are allowed to handle refrigerant, with fines of up to $37,500 for violations. Beyond the legal risks, refrigerant is hazardous to work with if you lack the proper tools and training.
Certified professionals use specialized equipment, such as electronic leak detectors, UV dye testing, and pressure gauges, to locate leaks and check refrigerant levels accurately. They also perform detailed measurements, like "Superheat" or "Subcooling", to confirm whether the system is undercharged.
Recharging refrigerant costs typically range from $150 to $600, depending on the system size and refrigerant type. If your unit uses R-22 - phased out of production as of January 1, 2020 - prices can climb to $300–$750 or more due to its limited availability. Newer systems using R-410A are much more affordable, with per-pound costs generally between $20 and $40.
Attempting to add refrigerant on your own is not only illegal but also dangerous. Proper handling requires tools like manifold gauges and vacuum pumps, along with EPA certification. Plus, adding refrigerant without fixing the underlying leak is a waste of money and could void your system’s warranty. Always leave this job to the professionals.
2. Dirty or Clogged Air Filters
Dirty air filters are one of the main reasons your AC might stop blowing cold air. When filters are clogged with dust and debris, they block the airflow your system needs to cool effectively. This restricted airflow makes it harder for the AC to remove heat, which is why you might feel warm air coming from the vents. In some cases, the limited airflow can cause the coil temperature to drop below 32°F, leading to ice buildup. This ice can either reduce cooling efficiency or cause the system to shut down entirely.
Chris Carter from Alabama Climate Control sums it up perfectly:
A dirty air filter can do more than just reduce airflow; it can prevent your system from cooling altogether.
Just like low refrigerant levels, a clogged filter disrupts the cooling cycle. Ignoring it can lead to costly repairs. When airflow is restricted, your AC works harder than it should, which can overheat the compressor or cause short cycling - where the system repeatedly turns on and off. Plus, a struggling AC with blocked airflow can use up to 20% more energy than a properly maintained unit, adding to your energy bills.
Let’s look at how you can inspect and replace your air filter to get your system running smoothly again.
How to Check and Change Your Air Filter
Checking your air filter is simple and can save you from expensive repairs. Before you begin, turn off your AC at the thermostat to prevent debris from being sucked into the unit. Most filters are located either in the return air duct or inside the indoor air handler unit.
Once you’ve located the filter, remove it and hold it up to a light source. If it looks like a "gray fuzzy blanket" or blocks most of the light, it’s time for a replacement. Peter from PRO Electric Plus HVAC shares:
I've arrived at homes where the only issue was a filter that looked like a gray fuzzy blanket – replacing it allowed the AC to breathe and cool properly again.
Filters should generally be replaced every 1 to 3 months. If you have pets, allergies, or live in a dusty environment, you might need to change them more frequently. Replacement filters are inexpensive, typically costing between $5 and $20, making this a quick and budget-friendly maintenance task. When installing a new filter, make sure the arrows on the frame point toward the unit.
Failing to replace a dirty filter can cause more damage than you might think. Let’s explore what happens when filters are neglected.
What Happens When You Ignore Dirty Filters
Skipping regular filter changes doesn’t just affect comfort - it can lead to serious damage. Dust and debris can coat the evaporator coil, creating an insulating layer that blocks heat absorption. This buildup prevents the refrigerant from doing its job and may eventually cause the coil to freeze. Ice formation can damage the compressor, leading to expensive repairs.
If the evaporator coil becomes too dirty or frozen, professional cleaning can cost anywhere from $150 to $450. If the coil needs to be replaced, you’re looking at costs exceeding $2,000. Even diagnostic service calls typically range from $75 to $150. Regularly replacing your air filter is a simple step that can help you avoid these hefty expenses.
3. Frozen Evaporator Coils
Restricted airflow, much like low refrigerant levels or dirty filters, can lead to frozen evaporator coils. When ice forms on these coils, it creates a barrier that stops the refrigerant from pulling heat out of your home's air. This icy buildup acts like insulation, making the coil even colder and setting off a vicious cycle. As the ice spreads across the coil's fins, airflow becomes severely restricted, causing the AC to blow warm air - or, in some cases, stop airflow entirely [30, 32].
Frozen coils usually stem from restricted airflow or low refrigerant, both of which have been discussed earlier [29, 30, 31]. For example, if a system operates with airflow below 350 CFM per ton of cooling capacity, it can lose up to 30% of its cooling efficiency, increasing the risk of freezing. Similarly, a refrigerant undercharge of just 10% can lower coil temperatures by 9–14°F, leading to frost formation within 30 minutes of operation. Let’s look at some telltale signs of frozen evaporator coils.
Signs Your Coils Are Frozen
A clear sign of frozen coils is visible ice or frost on the evaporator coils, refrigerant lines, or even the outdoor unit. You might also feel warm air coming from the vents or notice weak airflow as the ice clogs the system. Keep an eye out for puddles or an overflowing drain pan caused by melting ice. Additionally, a hissing or bubbling noise could point to a refrigerant leak - a common trigger for coil freezing. Another clue? A sudden spike in your energy bills, as a frozen system works harder and runs longer to try to cool your home.
How to Thaw Frozen Coils and Prevent Future Freezing
If you discover frozen coils, turn off your AC right away to protect the compressor. Then, switch the fan setting from "AUTO" to "ON." This will circulate warm indoor air over the coils and help speed up the melting process. Thawing usually takes 4 to 8 hours. To manage the melting water, place towels or a tray near the air handler.
Never try to chip or scrape off the ice - this can damage the refrigerant lines or the delicate fins. While waiting for the system to thaw, check and replace a dirty air filter, clear any blocked return vents, and make sure at least 80% of your supply registers are open. Once the ice is gone, restart the AC. If it freezes again within 24 hours, this could signal a refrigerant leak or a mechanical issue that needs professional attention.
To avoid future freezing, replace your air filters every 30 to 90 days and schedule annual maintenance to check refrigerant levels and clean the coils. Some services, like those from West Florida Air, even offer UV light installations to prevent mold and organic buildup on damp coils, which can restrict airflow and lead to freezing. Regular maintenance and filter replacements go a long way in keeping your system running smoothly.
4. Dirty Condenser Coils or Blocked Outdoor Unit
Just like low refrigerant levels or clogged filters can mess with your AC's cooling ability, dirty condenser coils can seriously impact its efficiency. The outdoor condenser unit’s main job is to release the heat it pulls from inside your home into the outside air. But when dirt, grass clippings, pollen, or debris coat the coils, they act like insulation, blocking heat transfer. This keeps the refrigerant warmer than it should be, forcing your AC to work harder and run longer to hit the temperature you’ve set. The result? Higher energy bills, extra strain on the compressor, and potential issues like refrigerant line icing or overheating.
Heating and cooling make up about 50% of a home's energy use, so a dirty condenser doesn’t just hurt your AC - it hits your wallet too. If you live in a coastal area like Florida, salt in the air can speed up coil corrosion, making regular cleaning even more essential. HVAC pros suggest rinsing the condenser coils at least once a year, but if your home is surrounded by heavy pollen, cottonwood trees, or dusty roads, you might need to clean them twice a year. Here’s how you can handle it yourself.
How to Clean Your Outdoor Unit
Start by cutting the power to your AC. Turn it off at the thermostat and flip the disconnect switch or breaker to avoid any electrical risks. Then, clear the area around the unit. Trim back any plants or shrubs to leave a 2- to 3-foot gap, and remove leaves, twigs, or other debris by hand from the base and sides.
Use a garden hose to gently rinse the coils from the outside in. Skip the pressure washer - it’s too strong and can bend or damage the aluminum fins. If you spot light dust or pet hair clinging to the fins, use a soft brush or a vacuum with a brush attachment before rinsing. Bent fins? You’ll need a fin comb to straighten them and restore airflow.
"These quick steps can restore airflow and cooling performance in many cases, and they're safe, homeowner-friendly ways to troubleshoot before calling for service." - Jennifer Fletcher, Owner, Modern Air Solutions
Why Regular Maintenance Matters
While these DIY steps can tackle surface grime, deeper cleaning often requires a professional touch. HVAC technicians have access to chemical cleaners designed to dissolve stubborn, oily buildup that a garden hose can’t handle. They’ll also remove the unit’s panels to clean the coils from the inside, which is far more effective for removing embedded dirt and clogs.
Scheduling professional maintenance annually with a trusted company like West Florida Air ensures your condenser coils stay in top shape and your system runs smoothly before the peak cooling season. Though the average AC unit lasts 15 to 20 years, heavy use in humid climates can shorten its lifespan. Regular tune-ups can help extend its life and protect your investment.
5. Thermostat Problems
Sometimes, the real issue with your air conditioner isn’t the unit itself - it’s the thermostat controlling it. Problems with the thermostat can disrupt your cooling system just as much as refrigerant or filter issues. Simple things like incorrect settings, dead batteries, or poor placement can throw off your AC’s performance. Interestingly, thermostat-related problems account for about 10% of HVAC service calls. A quick check of your thermostat could save you both time and money.
One common issue is the fan setting. When set to "On" instead of "Auto", the blower runs non-stop, even when the compressor isn’t cooling. This causes warm, uncooled air to circulate through your vents. Switching the fan to "Auto" ensures air only flows when the system is actively cooling.
Make sure your thermostat is set to "Cool" and adjust the target temperature to at least 5°F lower than the current room temperature to kickstart the cooling cycle. If the display is dim or blank, the batteries might be dead. A blank screen often means the thermostat isn’t sending the "cooling" signal to your outdoor unit.
How to Fix Common Thermostat Issues
Start with the basics: confirm the mode is set to "Cool" and the fan is on "Auto." If the display is blank or the thermostat isn’t responsive, replace the batteries. Many models rely on battery power to communicate with the AC. For touchscreen models, try a hard reset. Turn the thermostat to "Off", shut off the AC breaker at your electrical panel for about five minutes, then restore power and set the thermostat back to "Cool".
"Sometimes it's as simple as adjusting the thermostat setting or reprogramming your smart thermostat to run your AC at different times of the day." - HVAC Expert
Also, consider where your thermostat is located. If it’s near a heat source like a lamp, TV, or direct sunlight, it may read temperatures inaccurately, causing your AC to underperform. For programmable or smart thermostats, ensure that scheduled settings or "hold" functions aren’t overriding your adjustments. If you hear a click but the AC doesn’t start, the problem might be a tripped breaker or a failed capacitor.
These simple steps can resolve most thermostat issues and set the stage for more advanced solutions.
Why Upgrade to a Smart Thermostat
Smart thermostats do more than just control your home’s temperature. They can act as an early warning system for your AC, monitoring performance and sending alerts for issues like short cycling or power outages. They’ll even remind you when it’s time to replace a dirty filter. Plus, they adapt to your habits and let you control your system remotely, helping you catch small problems before they turn into costly repairs.
With heating and cooling making up roughly 50% of a household’s energy use, smart thermostats can increase efficiency and lower utility bills. If you’re considering an upgrade, West Florida Air offers professional installation to ensure your new thermostat is properly wired and calibrated. A correct setup is crucial - errors in wiring or placement can lead to the same cooling problems you’re trying to solve.
6. When to Call West Florida Air
After addressing common AC issues like low refrigerant, clogged filters, or frozen coils, there are times when professional expertise is essential. For instance, if your air conditioner runs non-stop but fails to reach the desired temperature or only blows lukewarm air, it’s time to call in the pros. Strange noises - like hissing, bubbling, grinding, or loud clanking - often point to mechanical problems that need a professional touch.
Warning Signs You Need Professional Service
Electrical problems are a big red flag. If your circuit breaker trips frequently, or you detect burning smells or electrical odors coming from your AC, shut it off immediately and contact a technician. Attempting to fix electrical components, wiring, or capacitors on your own is not only risky but could also damage your system.
Excessive water pooling or noticeable leaks around your indoor unit is another issue that requires professional attention.
"Refrigerant work should always be done by a licensed HVAC professional - it's not a DIY task." - I Care Air Care
A sudden spike in your utility bills might mean your system is working harder than it should, possibly due to mechanical issues or refrigerant problems. Interestingly, 90% of hot air issues can be traced back to the outdoor condenser unit. Rising indoor temperatures during extreme heat - especially in households with infants, older adults, or people with health conditions - also call for immediate professional help.
What West Florida Air Offers
When these warning signs show up, West Florida Air is ready to step in. They provide 24/7 emergency services, ensuring you’re never left without cooling when it matters most. To make repairs or replacements easier on your budget, they offer financing options with terms ranging from 12 to 60 months. Qualified buyers can even take advantage of promotions offering 0% APR.
As a veteran-owned company serving Pasco, Pinellas, and Hernando counties, West Florida Air has the knowledge and tools to tackle issues like leaky ductwork, failing compressors, and refrigerant leaks. These problems require licensed technicians and specialized diagnostics, which they’re fully equipped to handle. Plus, they prioritize transparency by providing upfront pricing before any work begins. For added convenience, they accept all major credit cards, making the process as smooth as possible.
Conclusion
Sometimes, cooling issues can be resolved with a few simple steps. Start by checking the thermostat settings, ensuring filters are clean, and clearing debris around the outdoor unit. These small adjustments often restore proper cooling. If you see ice forming on your system, turn it off and allow it to thaw safely before proceeding.
However, not all problems can be fixed with DIY solutions. Issues like refrigerant leaks, electrical malfunctions, or compressor failures demand professional attention. Trying to fix these yourself can void your warranty, pose safety risks, or even turn a minor repair into a major expense. As Mike Lea, Co-owner of Lea Heating & Air Conditioning, explains:
Air conditioners use high-voltage electricity, so it's always best to call a professional to inspect the unit.
For those in Pasco, Pinellas, and Hernando counties, West Florida Air offers 24/7 emergency service with upfront pricing. This veteran-owned business handles everything from diagnostic calls (ranging from $75 to $150) to full compressor replacements. They also provide flexible financing options - spanning 12 to 60 months - with 0% APR promotions for eligible customers. Regular professional maintenance is key to keeping your system running smoothly for years to come.
If your AC is running nonstop but not cooling, making strange noises, or tripping the circuit breaker repeatedly, it’s time to power it down and call in the pros. West Florida Air has the tools and expertise to pinpoint the issue and get your home comfortable again. Acting quickly can save you from bigger problems down the line, protecting both your comfort and your investment.
FAQs
Why does my AC cool at night but not during the hottest part of the day?
During the hottest part of the day, your AC might have a hard time keeping your home cool. This happens because higher outdoor temperatures force the system to work harder. Some common culprits include a dirty air filter, clogged condenser coils, low refrigerant levels, or other mechanical issues that become more pronounced under intense heat. Fixing these issues can help your AC perform better, even when temperatures are at their peak.
What’s the safest way to tell if my AC has a refrigerant leak?
The safest way to spot a refrigerant leak is by paying attention to certain warning signs. These include hissing sounds coming from your unit, a noticeable drop in cooling performance, or unexpectedly higher energy bills. Such issues could point to cracks or holes in the refrigerant lines.
Because refrigerants contain toxic chemicals, it's crucial to avoid trying to fix the problem yourself. Instead, reach out to a licensed HVAC professional who can safely detect and repair the leak using the proper tools and techniques.
How can I tell if my AC problem is airflow-related or an electrical issue?
If your AC isn't working properly, start by checking if the issue is related to airflow. This involves inspecting and cleaning the filters, ensuring that vents are unobstructed, and looking for any blockages in the system. Poor airflow is a common culprit and often easy to fix.
If airflow isn’t the problem, the issue might be electrical. This could include power supply problems, blown fuses, or damaged wiring. Double-check that the unit is receiving power, reset any tripped breakers, and look for visible signs of wear or damage in the wiring.
Begin with the simpler airflow checks. If those don’t resolve the issue, move on to examining the electrical components. And if you’re still unsure or uncomfortable troubleshooting further, it’s a good idea to call in a professional for help.