
AC Not Working? Troubleshooting Guide
When your AC stops working, don’t panic. Start with these simple troubleshooting steps to identify and possibly fix the issue:
-
Check Thermostat Settings:
- Ensure it's set to "Cool" mode and the temperature is at least 3°F lower than the room temperature.
- Replace batteries if the display is blank or dim.
-
Inspect the Air Filter:
- A clogged filter can restrict airflow, causing frozen coils or weak cooling.
- Replace filters every 1-3 months during peak use.
-
Verify Power Supply:
- Check the circuit breaker panel for tripped breakers and reset them once.
- Inspect the outdoor disconnect switch for blown fuses or a turned-off switch.
-
Examine the Outdoor Unit:
- Clear debris around the condenser and ensure at least 2 feet of clearance.
- Look for ice buildup or physical damage to the coils or fan blades.
-
Check Air Vents and Indoor Coils:
- Ensure vents are open and unobstructed.
- Inspect the evaporator coil for dirt or ice; clean with a no-rinse foam coil cleaner if needed.
-
Look for Signs of Refrigerant Leaks:
- Warm air, hissing sounds, or frozen lines may indicate low refrigerant. This requires professional repair.
If these steps don’t resolve the problem, or if you notice persistent electrical issues, refrigerant leaks, or mechanical failures, contact a licensed technician immediately. Regular maintenance can prevent many of these problems and extend your AC’s lifespan.
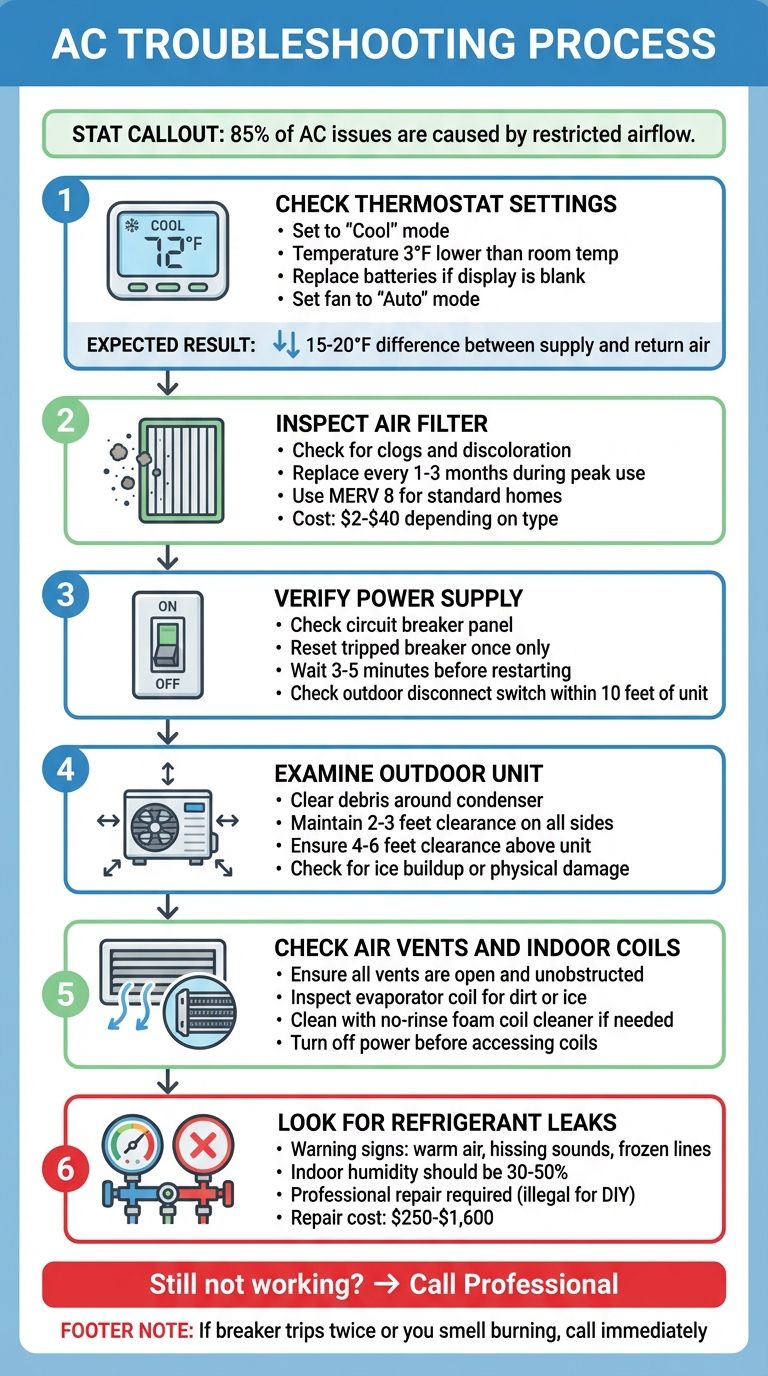
6-Step AC Troubleshooting Guide for Homeowners
How To Troubleshoot & Fix Your Home Air Conditioner Yourself.
sbb-itb-ab7d5a1
Check Your Thermostat Settings
Take a closer look at your thermostat. Many AC issues stem from something as simple as incorrect thermostat settings.
Verify Mode and Temperature Settings
First, confirm that your thermostat is set to "Cool" mode - not "Heat", "Off", or "Fan Only." It’s easy to accidentally switch modes. Next, ensure the temperature setting is at least 3°F lower than the current room temperature. For example, if the thermostat is set to 78°F and the room is already 76°F, the AC won’t turn on.
Set the fan to "Auto" instead of "On." When the fan is set to "On", it runs continuously, circulating air without actual cooling unless the compressor is active.
Another thing to check is the thermostat's placement. If it’s exposed to direct sunlight or positioned near a heat source like a lamp, it might misread the room temperature, causing the system to cycle unpredictably. A properly functioning AC should create a 15-20°F difference between the supply and return air.
Finally, make sure the thermostat has a reliable power source. If the screen is blank or dim, the batteries may need replacing.
Replace Thermostat Batteries
A blank or dim display is often a sign of dead batteries. Most programmable thermostats will flash a low battery warning about one or two months before the batteries fail completely. If you missed the warning, don’t worry - replacing the batteries is quick and simple.
To replace them, remove the thermostat housing from the wall plate. Flip it over to locate the battery compartment. Insert fresh AA or AAA alkaline batteries, ensuring the polarity (+ and -) matches the markings. Once done, snap the cover back on and give it about 30 seconds to reboot.
It’s a good habit to replace thermostat batteries once a year. Many homeowners do this at the start of fall or during routine tasks like changing smoke detector batteries. With batteries costing only $3 to $8, it’s a small investment to avoid unnecessary service calls. However, if you find yourself replacing batteries frequently, it could signal a wiring issue or a failing thermostat.
Inspect and Replace Your Air Filter
Once you've checked your thermostat, the next step is to inspect your air filter. A clogged air filter can cause a range of AC problems. When it's too dirty, airflow is restricted, putting extra strain on your system. This can lead to frozen coils, increased energy costs, and even shorten the lifespan of your AC unit.
Locate and Inspect the Filter
Before you start, make sure to turn off the power to your AC at both the thermostat and the circuit breaker. For central air systems, the filter is usually located in a slot near the indoor air handler or behind a return air vent grille on the wall or ceiling. If you have a window unit, the filter is typically found in the grill facing the room.
Carefully slide out the filter and hold it up to a light source. If little or no light shines through - or if you notice discoloration, weak airflow, ice buildup on the unit, or a musty smell - it’s time for a replacement.
"A clean filter is your first line of defense against inefficient cooling and potential system damage." - Home Therapist
Replace with the Correct Filter Type
When purchasing a new filter, check the dimensions printed on the frame of your old one (e.g., 16x25x1). For most households, a MERV 8 filter strikes a good balance between airflow and filtration. If you’re dealing with allergies or smoke, consider a MERV 11–13 filter, but keep in mind that higher-rated filters can reduce airflow in systems not designed for them.
Filters vary in price, with disposable fiberglass options starting at around $2 and high-efficiency pleated filters costing up to $40. When installing the new filter, make sure the airflow arrow points toward the air handler. During peak cooling months, inspect the filter monthly. Standard 1-inch filters usually need replacement every 1 to 3 months, while thicker 4-inch filters can last 6 to 12 months. If your coils are icing up due to a dirty filter, replace it immediately and set your system to "Fan Only" mode to melt the ice before resuming normal operation.
Check Power Supply and Circuit Breakers
If your thermostat and filter are fine, the next step is to confirm that your system is receiving power. Air conditioning systems use a significant amount of electricity and typically have separate breakers for the indoor handler and outdoor unit. If either breaker has an issue, your cooling system could stop working altogether.
Check the Circuit Breaker Panel
Locate your main electrical panel, which is often in the garage, basement, laundry room, or a utility closet. Look for breakers labeled "HVAC", "AC", or "Air Conditioner." A tripped breaker doesn’t always flip fully to "OFF" - it might sit in a middle position or display a color indicator to signal a problem.
To reset a tripped breaker correctly, first switch it completely to "OFF", then push it firmly back to "ON". Before doing this, turn off the thermostat or set it to "COOL" with the temperature at least 5°F lower than the current room temperature. Once the breaker is reset, wait 3 to 5 minutes before restarting the AC. Most modern systems have built-in delay timers to protect the compressor.
Important safety note: Never touch the electrical panel while standing in water. If the breaker trips again immediately after being reset, do not attempt to reset it a second time. This could indicate a serious issue like a short circuit, which requires professional attention. Additionally, check for sub-panels in areas like garages or utility rooms since some AC components may draw power from a secondary panel.
After verifying the main panel, inspect the outdoor disconnect switch for further troubleshooting.
Inspect the Outdoor Disconnect Switch
The outdoor disconnect switch plays a key role in your AC's ability to function. This safety device is typically housed in a gray metal box located within 10 feet of the condenser. If it was turned off during colder months and not switched back on, it could prevent your AC from starting.
Open the disconnect box and confirm the fuse block is securely inserted and the switch is set to "ON." Look for signs of blown fuses, such as blackened areas. Many disconnect boxes have their own fuses, which can blow independently of the main circuit breakers. If the outdoor breaker trips but the indoor breaker doesn’t, your indoor unit will blow air, but it won’t be cool.
Here’s a quick guide to diagnosing electrical issues based on how your system is behaving:
| Symptom Pattern | Indoor Unit Status | Outdoor Unit Status | Likely Electrical Cause |
|---|---|---|---|
| Complete Silence | Nothing happens | Nothing happens | Main power supply failure or both breakers tripped |
| Fan runs, no cooling | Blower operates | No sound/operation | Outdoor breaker tripped or outdoor disconnect off |
| Clicking but no start | Responds to thermostat | Attempts to start | Failed capacitor or contactor |
| Breaker won't stay on | Trips immediately | Never starts | Short circuit in wiring or grounded compressor |
Examine the Outdoor Unit
Once you've confirmed the electrical supply, take a closer look at the outdoor condenser unit. This part of your AC system is responsible for removing heat from your home, so it needs to be in good shape and have plenty of airflow to work efficiently. Always make sure the power is turned off before starting any inspection or cleaning tasks.
Clear Debris Around the Unit
Your condenser unit needs space to "breathe." Ideally, there should be at least 2 to 3 feet (24 to 36 inches) of clearance on all sides to allow proper airflow. Overgrown plants, grass clippings, fallen branches, and leaves can block airflow, forcing your AC to work harder than it should. Check for any vegetation creeping too close to the unit and trim it back to maintain at least 24 inches of space. Additionally, ensure there’s 4 to 6 feet of open space above the unit so hot air can escape efficiently. Clear away any debris, like twigs or leaves, that may have piled up around the base or on top of the unit.
"The outdoor A/C unit is located under a deck. This can restrict airflow across the condenser coil, resulting in excessive heat build-up, reduced efficiency, and increased energy costs. In cases where airflow is severely restricted, the life expectancy of the A/C unit may be shortened."
– Marcel Gratton, CMI, Certified Master Inspector
After clearing the area, clean the condenser coils. Use a garden hose to rinse the coils from the inside out. Be gentle - avoid using a pressure washer, as the high pressure can damage the aluminum fins. For stubborn debris, a vacuum with a brush attachment can help remove buildup. Once the area is clean, check the unit for any signs of ice or physical issues.
Check for Ice or Physical Damage
Inspect the unit carefully for ice buildup or visible damage. Ice forming on the copper refrigerant lines or the coil cabinet is a clear red flag. You might also notice water pooling around the base, which could be melting ice. If you see ice, turn off the AC immediately and switch the thermostat fan to "On." This helps circulate air and speeds up the thawing process. Avoid trying to remove the ice manually with sharp tools, as this could damage the fins or puncture refrigerant lines. Be patient and allow the ice to melt completely, which might take a few hours.
While you're at it, check for any physical damage. Inspect the fan blades for cracks, wear, or imbalance. If the condenser coil fins are bent or flattened, it can restrict airflow and reduce efficiency. You can use a fin comb to straighten them, or call a professional if the damage is extensive.
"Stop and call for service immediately if you smell burning, hear loud buzzing, or see damaged wiring."
– Beacon Services & Appliances
Finally, listen for any unusual noises when the unit is running. Hissing or gurgling sounds could mean low refrigerant levels or airflow issues, both of which can lead to freezing. Grinding or squealing noises often point to mechanical problems with the fan motor that will need professional attention.
Check Air Vents and Indoor Coils
Once you've finished inspecting the outdoor unit, it's time to focus on the inside. For your air conditioner to run efficiently, proper airflow through the vents and across the evaporator coil is essential. Without enough warm air moving over the coil, moisture can freeze into ice. This ice buildup blocks airflow, making your system work harder than it should. Restricted airflow also puts extra strain on the compressor, which can lead to faster wear and tear on internal components. To prevent these issues, make sure airflow inside your home is unobstructed.
Inspect Supply and Return Vents
Take a walk through your home and check all the supply and return vents. Ensure each vent is fully open and free from obstructions like furniture, rugs, or curtains. Even partially blocked vents can lead to uneven temperatures, which is often a sign of airflow issues. If certain rooms feel warmer than others, a blocked or closed vent could be the culprit.
While you're at it, pay attention to the strength of the airflow coming from the supply vents. Weak airflow could point to a dirty evaporator coil or a clogged air filter. If you've already replaced the air filter and still notice weak airflow, it might be time to inspect the indoor coil.
Check the Evaporator Coil
Good airflow inside and outside is key to keeping your AC running smoothly. The evaporator coil, located inside your air handler or furnace cabinet, is usually shaped like an "A" or "N." Before opening any panels, turn off the circuit breaker to the indoor unit to avoid electrical hazards. Once the power is off, remove the access panel and check the coil for dirt, grime, or ice.
"When the evaporator coil gets coated with dust and buildup, it loses its heat-absorbing efficiency. That can cause weak cooling, high humidity indoors, longer run times, and in some cases a frozen coil that stops airflow and makes the system seem like it quit cooling."
– Beacon Services & Appliances
If you spot ice on the coil, turn off the AC and let the ice melt completely before continuing. Running the system while the coil is frozen can cause serious damage to the compressor. Once the ice has thawed, check the air filter again, as a clogged filter is often the main reason for frozen coils. If the coil is dirty, use a no-rinse foam coil cleaner and handle it carefully - avoid using sharp tools that could damage the delicate fins.
Identify Refrigerant Leaks and Other Complex Issues
After understanding the basics of your AC system, it's time to dig deeper. If your cooling system still struggles despite clean filters, clear vents, and well-maintained coils, the refrigerant level could be the culprit. Persistent warm air or a system that runs endlessly without reaching the set temperature might point to a refrigerant leak. These issues are not just tricky - they're also risky. Handling refrigerants involves health hazards, legal restrictions, and technical complexities, making it a job for professionals.
Signs of Low Refrigerant
Refrigerant leaks often come with telltale signs. For instance, if your vents are blowing room-temperature air even though the thermostat is set to a cool level (like 72°F), it could signal a problem. A hissing sound indicates a small crack where gas is escaping, while bubbling noises suggest a larger, more severe leak. Additional red flags include frozen evaporator coils or refrigerant lines caused by pressure drops, higher indoor humidity (ideally, humidity should stay between 30% and 50%), and sudden spikes in energy bills as your system struggles to cool effectively. In some cases, you might even notice a chemical or exhaust-like smell, which is a sign of a significant leak and a potential health risk.
"Refrigerant is a chemical substance and if there is significant leak, an exhaust smell may occur. Turn off the unit and call a professional. These fumes can be harmful to your health."
– Lennox
If you notice any of these warning signs, turn off your AC immediately and contact a professional technician.
Why Refrigerant Issues Require Professionals
Handling refrigerant is not a DIY task - it’s dangerous, ineffective, and often illegal. Exposure to refrigerants can cause dizziness, nausea, headaches, shortness of breath, and even more severe symptoms like seizures or loss of consciousness. The EPA mandates that only certified technicians can purchase, handle, or dispose of refrigerants safely. And here's the thing - just adding more refrigerant won’t fix the problem. Without addressing the leak, the refrigerant will continue to escape, not only wasting money but also harming the environment. These substances are potent greenhouse gases that contribute to ozone depletion and climate change.
Detecting and repairing leaks requires specialized tools like electronic detectors or fluorescent dyes - equipment most homeowners don’t have. Professional repairs, while an investment, typically cost between $250 and $1,600.
"Adding refrigerant without fixing the leak is unsafe and often illegal. It can harm the environment and pose health risks. Always leave this job to a licensed technician."
– Total Comfort
When to Contact West Florida Air
If your AC still isn’t working after trying basic troubleshooting, certain signs indicate it’s time to bring in the professionals.
Problems That Require Emergency Repairs
Some AC issues can’t wait and need immediate attention. If you notice any of the following, turn off your system and call West Florida Air right away:
- Circuit breakers keep tripping: If a breaker trips again right after being reset, it could signal a serious electrical issue.
- Burning smells or buzzing sounds: These, along with visible wire damage, are clear signs of trouble that require expert help.
- Ice buildup on refrigerant lines or outdoor units: This often points to an impending compressor failure, which can cost over $2,500 to fix.
- Unusual noises: Grinding or squealing sounds may indicate problems like a blown capacitor or motor failure.
- System running nonstop without cooling: This could mean a deeper mechanical issue.
- Outdoor unit won’t power on: If the indoor fan is running but the outdoor unit isn’t, it’s time to call in a technician.
Services and Benefits from West Florida Air
West Florida Air offers 24/7 emergency services and same-day repairs across Pasco, Pinellas, and Hernando counties. Whether it’s day or night, their team is ready to get your cooling system back in action.
- Service costs: Standard service calls start at $89, with typical repairs like capacitor or fan motor replacements ranging from $150 to $600.
- Flexible financing: They provide financing options with terms from 12 to 60 months. Qualified buyers can also access promotions like 0% APR and deferred payments for up to six months.
- Veteran-owned team: Their focus on integrity and professionalism ensures honest assessments and high-quality work.
If you’re unsure whether an issue requires professional help, the table below can guide you.
DIY Fixes vs. Professional Solutions
| Issue | DIY Action | Call a Technician |
|---|---|---|
| Thermostat | Replace batteries; check "Cool" and "Auto" settings | Recalibration or wiring repair |
| Air Filter | Replace every 30 days during peak use | N/A |
| Power Supply | Reset a tripped breaker once | Burning smells or persistent tripping |
| Outdoor Unit | Clear debris within a 2-foot radius | Fan not spinning; compressor won’t start |
| Refrigerant | N/A (DIY is illegal and hazardous) | Hissing sounds; recharging or sealing leaks |
| Drainage | Clear visible debris from the drain exit | Internal clogs or float switch issues |
| Coils | Gently rinse outdoor condenser fins | Cleaning frozen or dirty evaporator coils |
Key Rules to Remember
- Two-Trip Rule: Reset a tripped breaker once. If it trips again immediately, call a professional.
- 5,000 Rule: Multiply your unit’s age by the repair cost. If the total exceeds $5,000, replacing the unit is usually the better option.
Conclusion
This guide has outlined the essential steps to help you restore your cooling system quickly. Start with the basics: check your thermostat settings, inspect the filter, ensure the power supply is intact, and clear any obstructions around the outdoor unit. These straightforward actions address about 85% of issues caused by restricted airflow. Regular attention to these areas not only resolves immediate problems but also helps maintain your system’s efficiency over time.
Taking care of your AC system is a smart investment. A well-maintained unit can use 15–20% less energy and last 3–5 years longer - an especially important factor in Florida, where air conditioners run between 2,500 and 3,500 hours annually, compared to just 1,000 hours in northern states. With such heavy usage, regular maintenance becomes even more critical.
If these steps don’t solve the problem, it’s time to bring in a professional. Issues like refrigerant leaks, electrical malfunctions, frozen coils, or strange noises require expert attention. Continuing to operate a malfunctioning system can lead to compressor burnout, which could cost over $2,500 to replace. Knowing when to stop troubleshooting and call for help can save you from costly repairs.
West Florida Air is ready to assist with 24/7 emergency service across Pasco, Pinellas, and Hernando counties. Their veteran-owned team provides same-day repairs, honest assessments, and flexible financing options. Standard service calls start at $89, with common repairs typically ranging from $150 to $600.
Don’t wait - address issues now to avoid expensive repairs and keep your system running efficiently.
FAQs
How do I tell if my AC is short-cycling?
If your air conditioner keeps turning on and off every few minutes without finishing a full cooling cycle, it’s probably experiencing short cycling. Typically, a normal AC cycle runs for about 10–20 minutes, allowing your home to cool efficiently. When short cycling occurs, your system struggles to cool properly, leading to increased wear and tear on the unit and higher energy bills over time if the issue isn’t addressed.
What’s the safest way to thaw a frozen AC coil?
To safely thaw a frozen AC coil, the first step is to turn off the thermostat to avoid causing any damage. Switch the thermostat from COOL to OFF and set the fan to ON. This helps circulate air through the system, which can speed up the melting process. Be patient and let the ice melt naturally - this can take several hours. Avoid using direct heat sources or tools like blow dryers, as these can harm the system. Letting the thawing happen gradually is the safest approach.
When should I stop troubleshooting and call West Florida Air?
If simple fixes don’t solve the problem, it’s time to call West Florida Air - especially for more serious issues like refrigerant leaks, ice buildup on refrigerant lines, or electrical problems. These situations often require professional expertise to ensure the job is done safely and correctly.
Additionally, consider the $5,000 rule: multiply your unit's age by the repair cost. If the result is $5,000 or more, replacing the system might save you more money in the long run. Let the experts handle it to ensure the best solution for your home.